
Using Fillable LactForms


LactForms fillable format forms are designed for easy electronic (digital) use on a computer, tablet, or smartphone using any PDF app (Adobe PDF apps/programs recommended for optimal functionality). After entering the required information, the PDF file can be saved with a new filename to preserve the entries, emailed to the client/patient, or printed out and given to them during the consultation.
The following detailed information will help you navigate our fillable forms and is also included as a PDF document with all fillable version form purchases.
App/Program to Use | Handy Form Buttons | Date Fields | Signature Fields | Saving | Sending
PDF App/Program To Use
LactForms are designed to work with any PDF reader app/program or browsers with the free Adobe Acrobat Reader plugin (extension). For best results, use the free Adobe Acrobat Reader app/program.
Action Buttons
In the upper right-hand corner of each form, you’ll see one or two handy action buttons. “Clear All Fields” clears every entry in the form and resets it. (Use with caution—if a form with entries hasn’t been saved, those entries will be permanently deleted.) “PRINT” opens the print dialogue window to print a hardcopy with current entries. It can also save the form as a PDF (shortcut for the “Print —> Save as” command in the main menu). Some forms have additional separate buttons to clear (reset) only specific sections.
![]()
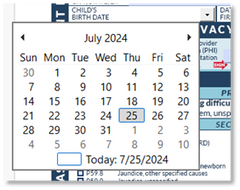
Date Fields
Dates fields can be entered directly as text or selected from the dropdown calendar. To use the dropdown calendar:
1. Move the mouse over the field or click/tap on it and the down arrow icon appears:
![]()
2. Select the down arrow icon and the calendar expands, opening to the current month and date. Select the month and date needed and it will be entered into the field:
3. Change the month: Select the month at the top:

...and the month selector appears:

4. Change the year: Select the year at the top:

...and the year selector appears:

Signature Fields
Some LactForms have electronic signature fields for either the parent, the Lactation Consultant, or both.


When a signature field is selected, a popup appears to either use an existing Digital ID or create a new one that can be used for future digital signatures.
If you already have a digital ID set up, just select it and hit Continue:

Your Digital ID appears, select Sign:


Another popup appears to Configure a new Digital ID with three options:
1. If you have a Signature Creation Device with a smart card or token, select the top option Use a Signature Creation Device and hit Continue:


The next popup appears to Create a self-signed Digital ID. Enter your information and hit Continue:

The next popup asks where to save your new Digital ID for future use. Save to File saves it on your device. Save to Windows Certificate Store (different name on iOS) saves to the Cloud. Select your preference and hit Continue.

If you select Save to File, a window opens to choose where to save it on your device (usually best to choose the default folder). Then enter a password (twice) and then hit Save:

If you select Save to Windows Certificate Store (different name on iOS), the file is saved to the Cloud, then hit Continue.
The last popup displays a preview of your Digital ID signature like this. Hit Sign to insert your Digital ID on the fillable form.
Even though the preview may display in a standard font, LactForms are configured with script font for signatures, so the final Digital ID signature will look look something like these (reach out if you prefer a non-script font):


After the Digital ID signature is completed, the signature field is locked (no longer editable).
On the Superbills, and depending on the signature type (parent or LC), other fields also may be locked:
- Parent’s HIPAA PRIVACY RELEASE signature locks all of the parent demographic information fields in the top section but leaves the rest of the form still editable.
- Lactation Consultant Certification signature locks all fields except the top section on the Superbills so that parents can fill that section out after the LC completes their sections and signs the LC certification.
Saving the PDF Form
Save the form with a new file name to retain the information (data) entered. Including the client/patient’s name and visit date can be helpful for record organization. The fillable fields highlight will not show in a hardcopy printed version.
Sending the PDF Form
Send the client/patient a copy of their completed form by emailing or printing the form as needed. The fillable fields highlights will not show on a hardcopy printed page. For on-site printing at home visits, consider a small portable printer like these.